Coffee machines need to be cleaned on a regular basis to ensure that they keep working at an optimum level and the buildup inside does not affect the taste of the coffee. Many people these days have Keurigs at home and they want to know how to clean Keurig 2.0. Thankfully, cleaning a Keurig coffee machine is not that difficult and there are a number of ways in which the machine can be completely cleaned.
The machine should be cleaned using distilled white vinegar 2 to 4 times a year but general cleaning should be done on a regular basis using soap as well as dish detergent. So, here are a few tips on how to clean Keurig 2.0.
How to Clean Keurig 2.0?
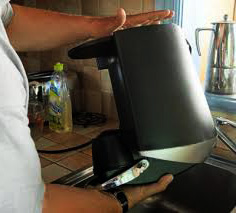
The first step in cleaning the machine is to disassemble the brewer. To disassemble the brewer, you will need to open the cover by lifting the handle and removing the K cup holder inside the machine. For removing the K cup holder, you will need to grab the top of the holder with one hand and push on the bottom of the K cup assembly with the other hand. They should eventually release the assembly.
It is important that you take caution while removing the K cup holder from the machine as they are sharp needles inside the machine. These needles may hurt you if you do not take proper care while removing the assembly inside. All the remaining pieces inside the brewer should not take too much effort to remove. You will need to gently pull on the funnel until it is separated from the K cup holder. Similarly, you can remove the drip tray by pulling it away from the machine base.
Once you have completely disassembled the brewer, it is time to clean all these different parts of the machine. One of the biggest advantages of this coffee machine is that all these parts are dishwasher safe which means that you can put them in dishwasher to ensure thorough cleaning. You should put these on the top rack of your dishwasher. Use a mild dish detergent and run the machine on standard wash setting.
See Also : Keurig 2.0 Cleaning Tool for keeping your Keurig well
You may rinse the K cup holder by hand under warm water. You may not need detergent or additional scrubbing for general cleaning but it is important that you take proper care while cleaning the K cup holder as there are sharp needles inside. If you want to wash drip tray, drip plate and funnel with your hands, you will need to soak these in hot soapy water and scrub them gently with the help of a nonabrasive cloth.
It is important to rinse all the parts to get rid of soap residue. Once you have cleaned all the parts, you can leave them aside to air dry for several hours or you can also use paper towels or a clean dish towel to dry them manually.
The upper portion and inside top of the K cup holder has needles with three holes. It is important that you remove any debris from these holes with the help of a paperclip. Sometimes, coffee grounds can easily get lodged in the exit needles and therefore, it is important that you clean them thoroughly during the cleaning process.
To clean the holes, you may insert a paperclip or other similar tool into each hole. You will be able to get the paperclip around 1 inch into the tube. You should move the paperclip around to get rid of anything lodged inside. This needle is located on the side and not on the top.
The removable lid and water tank is not dishwasher safe and therefore, you need to wash them by hand with the help of a nonabrasive cloth and clean water. You should avoid using detergent or cleansers to clean these parts. Chemicals in the water may result in contamination of water supply. Once cleaned with plain water, you should dry these parts with the help of a wet cloth or rinse them under hot running water. You may use also use paper towers to dry them manually.
You may also have some water stains or dried coffee grounds on your machine. These should be cleaned using a nonabrasive and damp cloth. Sometimes, soapy cloth may also be used for a more thorough cleaning. However, do not forget to remove the soap residue with the help of a clean damp cloth. You should never immerse the whole machine in water for cleaning as it will damage the insides of the machine.
Once you have cleaned all the parts, it is now time to reassemble the brewer. There are arrows marked on all the parts that will help you with reassembly. Make sure that you use gentle hands to reassemble the machine as pushing some parts too hard may break them and you will need to buy replacements.

Another method to clean your coffee machine is to use diluted white vinegar to clean the inside of the machine. The manufacturer says that the internal brewing tanks cannot be accessed and therefore, using vinegar is the only method to clean the inside of the machine. To clean the inside of Keurig with vinegar, you need to mix equal amounts of white vinegar and water. It is extremely important to dilute white vinegar as undiluted vinegar can damage the insides of your machine.
Cleaning the inside of your coffee machine with the help of vinegar is also known as descaling. Experts recommend descaling your coffee machine every 3 to 6 months. It not only helps in getting rid of the lime build up inside the coffee machine but also improves the ability of the brewer to heat. You should use this diluted white vinegar solution to run through the system a few times.
Overall, this is everything you need to know about how to clean Keurig 2.0. It is important that you clean your coffee machine on a regular basis to ensure that it keeps working at an optimum level and keeps providing tasty coffee every time. Experts also recommend using distilled water when possible.


